- 金币:
-
- 奖励:
-
- 热心:
-
- 注册时间:
- 2006-7-3
|
|

楼主 |
发表于 2008-5-23 13:08
|
显示全部楼层
TRADESTATION: THE QUEST FOR RELIABLE CROSSOVERS
Sylvain Vervoort's article in this issue, "The Quest For Reliable Crossovers," describes a trading system based on three functions: the triple exponential moving average (TMA), the heikin-ashi close (haC), and the "typical price" (TypicalPrice). Vervoort's strategy trades the crossover of the typical price and heikin-ashi TMAs (Figure 1).  FIGURE 1: TRADESTATION, CROSSOVER STRATEGY. Here is a demonstration of Vervoort's crossover strategy applied to a daily chart of S&P Depository Receipts (SPY). The zero-lagging TMAs of both the typical price (red line) and the heikin-ashi close (yellow line) are shown. The crossover of these two averages produces the displayed trades. TypicalPrice is a built-in function in TradeStation. The code for the triple exponential moving average was published in the February 2008 issue of S&C. The heikin-ashi code is provided here. The ELD file posted at TradeStation.com (see link) contains all of the necessary code. Vervoort reports doing a backtest of his system on more than 200 stocks. Code for performing such a test can be found by searching the TradeStation and EasyLanguage support forum for the topic "Batch Process for a series of charts" (https://www.tradestation.com/Discussions/Forum.aspx?Forum_ID=213). The TMA, like all exponential moving average calculations, is "starting-point dependent." This means the value of an exponential moving average on any bar depends on which bar the calculations began. To minimize the starting-point dependency of Vervoort's calculations, the strategy does not trade until four times the number of bars specified by the "Period" input have passed. The zero-lagging TMA indicator includes a similar delay before plotting. If you input the code into your PowerEditor, you can set both the TMA indicator and strategy to have a MaxBarsBack setting of "1" (one bar). To download the EasyLanguage code for these studies, go to the TradeStation and EasyLanguage support forum and search for the file "VervoortCrossover.ELD."
Function: haOpenhaOpen = 0.5 * ( AvgPrice + haOpen[1] ) ;Function: haChaC = 0.25 * ( AvgPrice + haOpen + MaxList( High, haOpen )+ Minlist( Low, haOpen ) ) ;Indicator: Zero-Lagging TMAinputs: Price( TypicalPrice ), Period( 55 ) ;variables: TMA1( 0 ), TMA2( 0 ), Difference( 0 ), ZeroLagTMA( 0 ) ;TMA1 = TEMA( Price, Period ) ;TMA2 = TEMA( TMA1, Period ) ;Difference = TMA1 - TMA2 ;ZeroLagTMA = TMA1 + Difference ;if CurrentBar > 4 * Period then Plot1( ZeroLagTMA, "ZeroLagTMA" ) ;Strategy: Vervoort Crossoverinputs: Investment( 1000 ), Period( 55 );variables: TMA1( 0 ), TMA2( 0 ), Difference( 0 ), ZeroLagTMA( 0 ), TMA3( 0 ), TMA4( 0 ), Difference2( 0 ), ZeroLagHeikinAshi( 0 ), NumShares( 0 ) ;TMA1 = TEMA( TypicalPrice, Period ) ;TMA2 = TEMA( TMA1, Period ) ;Difference = TMA1 - TMA2 ;ZeroLagTMA = TMA1 + Difference ;TMA3 = TEMA( haC, Period ) ;TMA4 = TEMA( TMA3, Period ) ;Difference2 = TMA3 - TMA4 ;ZeroLagHeikinAshi = TMA3 + Difference2 ;NumShares = IntPortion( Investment / Close ) ;if CurrentBar > 4 * Period then begin if ZeroLagTMA crosses over ZeroLagHeikinAshi then Buy NumShares shares next bar market else if ZeroLagTMA crosses under ZeroLagHeikinAshi then Sell next bar market ; end ;
TradeStation does not endorse or recommend any particular strategy. --Mark Mills
TradeStation Securities, Inc.
A subsidiary of TradeStation Group, Inc.
www.TradeStation.com
GO BACK
eSIGNAL: THE QUEST FOR RELIABLE CROSSOVERS
For this month's Traders' Tip, we've provided the formulas Tema.efs, ZeroLag_Tema.efs, HA_ZeroLag_Tema.efs, and ZeroLag_HA_Tema_Cross.efs, based on the formula code from Sylvain Vervoort's article in this issue, "The Quest For Reliable Crossovers." The studies contain formula parameters that may be configured through the Edit Studies option in the Advanced Chart to change the number of periods and price source for the averages. In addition, the ZeroLag_HA_Tema_Cross.efs contains a formula parameter to force the strategy to allow only long trades, which is also configured for backtesting with the Strategy Analyzer. Sample charts can be seen in Figures 2 and 3.  FIGURE 2: eSIGNAL, TEMA. This eSignal Advanced Chart displays the TEMA, zero-lag TEMA, and HA zero-lag TEMA studies. 
FIGURE 3: eSIGNAL, TEMA CROSSOVER. This eSignal Advanced Chart displays the HA Zero Lag TEMA study.
eSignal code for the zero-lag EMA study discussed in the article can be found in the February 2008 Traders' Tips section in the S&C back-issue archive (http://www.traders.com/Documenta ... ps/TradersTips.html) or the eSignal EFS Library. Meanwhile, the original heikin-ashi study mentioned in the article was covered in the February 2004 Traders' Tips, also found at the S&C back-issue archive. To discuss these studies or download complete copies of the formula code, please visit the EFS Library Discussion Board forum under the Forums link at www.esignalcentral.com or visit our Efs KnowledgeBase at www.esignalcentral.com/support/kb/efs/. The eSignal formula scripts (EFS) are also available for copying and pasting from the Stocks & Commodities website at Traders.com. --Jason Keck
eSignal, a division of Interactive Data Corp.
800 815-8256, www.esignalcentral.com
GO BACK
AMIBROKER: THE QUEST FOR RELIABLE CROSSOVERS
In "The Quest For Reliable Crossovers" in this issue, Sylvain Vervoort presents a basic trading system that uses a combination of techniques presented in earlier issues of STOCKS & COMMODITIES, namely the zero-lag exponential moving averages and heikin-ashi charts. The system is based on crossovers between averages calculated using a typical price and heikin-ashi transformation. For an example, see Figure 4.  FIGURE 4: AMIBROKER, CROSSOVER SYSTEM. Here is a daily QQQQ chart showing heikin-ashi candlesticks with 55-day zero-lag moving averages and arrows marking entry and exit points. Listing 1 shows a full-featured all-in-one formula that implements a heikin-ashi chart with zero-lag moving averages, together with basic trading system rules and entry/exit arrows. Using the Parameters window, you can adjust the average period as well as switch between regular candlestick charts and heikin-ashi charts. The same formula can also be used in the Automatic Analysis window to perform backtesting.
LISTING 1function ZeroLagTEMA( array, period ){ TMA1 = TEMA( array, period ); TMA2 = TEMA( TMA1, period ); Diff = TMA1 - TMA2; return TMA1 + Diff ;}/////////////////////// Heikin-Ashi codeHaClose = (O+H+L+C)/4;HaOpen = AMA( Ref( HaClose, -1 ), 0.5 );HaHigh = Max( H, Max( HaClose, HaOpen ) );HaLow = Min( L, Min( HaClose, HaOpen ) );// Velvoort is using not original, but modified Heikin-Ashi closeHaClose = ( HaClose + HaOpen + HaHigh + HaLow )/4;// you can switch between Heikin-Ashi chart and regular candlestick chartif( ParamToggle("Plot Heikin-Ashi", "No,Yes", 1 ) ) PlotOHLC( HaOpen, HaHigh, HaLow, HaClose, "Heikin Ashi " + Name(), colorBlack, styleCandle );else Plot( C, "Regular candles " + Name(), colorBlack, styleCandle );period = Param("Avg. TEMA period", 55, 1, 100 );ZLHa = ZeroLagTEMA( HaClose, period );ZLTyp = ZeroLagTEMA( Avg, period );Plot( ZLHa, "ZLTema(Ha,"+period+")", colorRed );Plot( ZLTyp, "ZLTema(Typ,"+period+")", colorGreen );Buy = Cross( ZLTyp, ZLHa );Sell = Cross( ZLHa, ZLTyp );PlotShapes( shapeUpArrow * Buy, colorGreen, 0, HaLow );PlotShapes( shapeDownArrow * Sell, colorRed, 0, HaHigh );
--Tomasz Janeczko, AmiBroker.com
www.amibroker.com
GO BACK
CQG: THE QUEST FOR RELIABLE CROSSOVERS
Here is the CQG code for recreating the custom studies detailed in the "Crossovers" sidebar in Sylvain Vervoort's article in this issue, "The Quest For Reliable Crossovers." Each study uses a parameters setup named Period. You can easily modify the lookback period from the study. Click on the "Parms" button to create the parameter "Period." The default period in the CQG component pac for the Tema study is 10 bars and 55 bars for the ZLHA and the ZLCLstudies.
Code for Tema:(3* MA(@,Exp,Period))-(3* MA( MA(@,Exp,Period),Exp,Period)) + MA( MA( MA(@,Exp,Period),Exp,Period),Exp,Period)Code for Zlha:HAOpen:=((((( Open(@)+ High(@)+ Low(@)+ Close(@))/4))[-1])+HAOpen[-1])/2;HACLose:=(( Open(@)+ High(@)+ Low(@)+ Close(@))/4+HAOpen + Maximum( High(@),HAOpen)+ Minimum( Low(@),HAOpen))/4;TEMA1:= TEMA.c1^(HACLose,Period);TEMA2:= TEMA.c1^(TEMA1,Period);Diff:=TEMA1-TEMA2;TEMA1+DiffCode for Zlcl:TEMA1:= TEMA.c1^(@,Period);TEMA2:= TEMA.c1^(TEMA1,Period);Diff:=TEMA1-TEMA2;TEMA1+Diff
A CQG component pac is available at the CQG website for installing the studies on CQG (http://www.cqg.com/Support/Downloads.aspx). The pac is also available at Thom Hartle's personal blog, www.hartleandflow.com. --Thom Hartle
CQG, Inc.
www.cqg.com
GO BACK
WEALTH-LAB: THE QUEST FOR RELIABLE CROSSOVERS
The code for Wealth-Lab version 5.0 to use the zero-lag triple EMA crossover system presented in Sylvain Vervoort's article in this issue, "The Quest For Reliable Crossovers," is given here. We interpreted the "power of analyzing" logic to exit for a profit when the averages cross, but exit for a loss at the lesser price of a 10% stop-loss or a close lower than the lowest low of the 21 bars prior to entry. Running that strategy in Portfolio Simulation mode using 5% of equity per trade on the NASDAQ 100 over the five years ending 12/31/2007 resulted in gains of approximately 21% annualized. The actual result varies from simulation to simulation since the portfolio can hold only 20 positions simultaneously using the 5% of equity sizing method. The buy & hold strategy, however, returned nearly 38% Apr over the same period (Figure 5).  FIGURE 5: WEALTH-LAB, CROSSOVER TRADING SYSTEM. Note that one of the crossovers did not result in a simulated trade. This is not an error but rather due to the results of a Portfolio Simulation in which insufficient equity existed at the time of the trading alert. The WealthScript code also creates the heikin-ashi chart style. WealthScript strategy code:/* Code for the derived WealthScript Class using TASCIndicators; */private StrategyParameter emaPeriod; // Slider parameterpublic ReliableCrossovers(){ emaPeriod = CreateParameter("EMA Period", 55, 10, 120, 5);}public DataSeries ZLTEMASeries(DataSeries Source, int Period, EMACalculation calcType){ DataSeries tma1 = TEMA.Series(Source, Period, calcType); DataSeries tma2 = TEMA.Series(tma1, Period, calcType); return tma1 + (tma1 - tma2);}protected override void Execute(){ /* Create a Heikin-Ashi chart above the main PricePane */ DataSeries HO = Open + 0; // intializations DataSeries HH = High + 0; DataSeries HL = Low + 0; DataSeries HC = (Open + High + Low + Close) / 4; DataSeries haC = HC + 0; haC.Description = "Heikin-Ashi Close"; for (int bar = 1; bar < Bars.Count; bar++) { double o1 = HO[ bar - 1 ]; double c1 = HC[ bar - 1 ]; HO[bar] = ( o1 + c1 ) / 2; HH[bar] = Math.Max( HO[bar], High[bar] ); HL[bar] = Math.Min( HO[bar], Low[bar] ); haC[bar] = ( HC[bar] + HO[bar] + HH[bar] + HL[bar] ) / 4; } ChartPane haPane = CreatePane(40, true, true); PlotSyntheticSymbol(haPane, "Heikin-Ashi", HO, HH, HL, HC, Volume, Color.DodgerBlue, Color.Red); //Obtain SMA period from parameter int period = emaPeriod.ValueInt; double stop = 0d; double LL = 0d; DataSeries typPrice = ( High + Low + Close ) / 3; DataSeries zlTyp = ZLTEMASeries(typPrice, period, EMACalculation.Modern); zlTyp.Description = "ZeroLagTEMA(typPrice, " + period + ")"; PlotSeries(PricePane, zlTyp, Color.Blue, LineStyle.Solid, 2); DataSeries zlHa = ZLTEMASeries(haC, period, EMACalculation.Modern); zlHa.Description = "ZeroLagTEMA(HeikinAshiClose, " + period + ")"; PlotSeries(PricePane, zlHa, Color.Red, WealthLab.LineStyle.Dashed, 2); for(int bar = period; bar < Bars.Count; bar++) { if (IsLastPositionActive) { Position p = LastPosition; stop = Math.Min(LL, p.EntryPrice * 0.9); if( CrossUnder(bar, zlTyp, zlHa) && Close[bar] > p.EntryPrice ) SellAtMarket(bar + 1, p, "Profit"); else if( Close[bar] < stop ) SellAtMarket(bar + 1, p, "Stop Loss"); } else if( CrossOver(bar, zlTyp, zlHa) ) { LL = Lowest.Series(Low, 21)[bar]; BuyAtMarket(bar + 1); } }}
--Robert Sucher
www.wealth-lab.com
GO BACK
NEUROSHELL TRADER: THE QUEST FOR RELIABLE CROSSOVERS
The zero-lag indicators described by Sylvain Vervoort in his article in this issue, "The Quest For Reliable Crossovers," can be easily implemented in NeuroShell Trader by combining a few of NeuroShell Trader's 800+ indicators. Select "New Indicator ..." from the Insert menu and use the Indicator Wizard to create the following indicators:
ZeroLag EMA:Add2( ExpAvg( Close, period ), Subtract( ExpAvg( Close, period ), ExpAvg( ExpAvg( Close, period )) ) )ZeroLag TEMA:Add2( TEMA( Close, period ), Subtract( TEMA( Close, period ), TEMA(TEMA( Close, period )) ) )ZeroLag Heikin-ashi TEMA:Add2( TEMA( HeikinAshiClose(), Period ), Subtract( TEMA(HeikinAshiClose(), period ), TEMA( TEMA(HeikinAshiClose(), period )) ) )ZeroLag MedianPrice TEMA:Add2( TEMA( Avg2(High,Low), Period ), Subtract( TEMA(Avg2(High,Low), period ), TEMA( TEMA(Avg2(High,Low), period )) ) )
Note: The zero-lagging TEMA and heikin-ashi zero-lagging TEMA are based on the HeikinAshiClose and TEMA custom indicators, which NeuroShell Trader users can download for free at www.ward.net. To recreate the crossover trading strategy as described in Vervoort's article (Figure 6), select "New Trading Strategy ..." from the Insert menu and enter the following in the appropriate locations of the Trading Strategy Wizard:  FIGURE 6: NEUROSHELL, CROSSOVER SYSTEM. Here is a NeuroShell Trader chart that shows the TEMA crossover based on Sylvain Vervoort's technique. Buy Long Condition:CrossAbove (ZeroLag MedianPrice TEMA, ZeroLag Heikin-ashi TEMA )Sell Long Condition:CrossBelow (ZeroLag MedianPrice TEMA, ZeroLag Heikin-ashi TEMA ) If you have NeuroShell Trader Professional, you can also choose whether the system parameters should be optimized. After backtesting the trading strategy, use the "Detailed Analysis ..." button to view the backtest and trade-by-trade statistics for the crossover strategy. Users of NeuroShell Trader can go to the STOCKS & COMMODITIES section of the NeuroShell Trader free technical support website to download a copy of this or any previously published Traders' Tips. For more information on NeuroShell Trader, visit www.NeuroShell.com. --Marge Sherald, Ward Systems Group, Inc.
301 662-7950, sales@wardsystems.com
www.neuroshell.com
GO BACK
WORDEN BROTHERS BLOCKS: THE QUEST FOR RELIABLE CROSSOVERS
In his article in this issue, "The Quest For Reliable Crossovers," Sylvain Vervoort discusses several ways to smooth closing prices with as little lag as possible. Charts with triple exponential moving averages (TEMA), averages based on heikin-ashi closing prices, and zero-lag averages can be found in the Share library of Blocks 3.0. (Note: To use the indicators and charts in this Traders' Tip, you will need the free Blocks software. Go to www.Blocks.com to download the software and get detailed information on the available data packs.) Click the Share button, then type in part of the name of a chart listed below on the Chart tab, then click the Search button. EMA - TEMA - TEMA of heikin-ashi TEMA zero-lagging average Zero-lag heikin-ashi TEMA - Median price zero lag TEMA Reliable crossovers In Figure 7, the sample chart shows a typical price zero-lag TEMA (green) vs. a heikin-ashi zero-lag TEMA (red) to time entry and exit conditions.
 FIGURE 7: WORDEN BLOCKS, CROSSOVERS USING A PERIOD OF 55 BARS. You can experiment with different periods to find the optimum period for a specific stock.
For more information and to view Blocks tutorial videos, go to www.Blocks.com. --Bruce Loebrich and Patrick Argo
Worden Brothers, Inc
www.blocks.com.
GO BACK
ASPEN GRAPHICS: THE QUEST FOR RELIABLE CROSSOVERS Aspen Graphics offers several styles of visual cues for displaying the crossovers discussed in Sylvain Vervoort's article in this issue, "The Quest For Reliable Crossovers." By creating small formula files for the various averages used in Vervoort's article, Aspen provides a platform where formulas become modular and reusable. Due to space concerns, only those used directly in the crossover are displayed here. The full list of formulas can be found on our forums at http://www.aspenres.com/forums/viewtopic.php?f=3&t=13. We start by creating the heikin-ashi candle, TEMA, and zero-lag TEMA formulas and call those formulas in our crossover formula. We implement the crossover using a formula that returns integer values. We can then take this formula and apply it to text-on-chart formulas as well as color rules and email alerts. Figure 8 illustrates text-on-chart visual cues as well as color rules on both time-based and tick-based charts.  FIGURE 8: ASPEN GRAPHICS, CROSSOVERS. This screenshot illustrates text-on-chart visual cues as well as color rules on both time-based and tick-based charts. haOpen(input) = ( ( ( $1.open[1] + $1.high[1] + $1.low[1] + $1.close[1] ) / 4 )+ $1.prev) / 2haClose(input) = begin val1 = ($1.open + $1.high + $1.low + $1.close) / 4 val2 = 0 val3 = 0 hopen = haOpen($1) retval = 0 if($1.high > hopen) then val2 = $1.high if($1.high <= hopen) then val2 = hopen if($1.low < hopen) then val3 = $1.low if($1.low >= hopen) then val3 = hopen retval =( val1+ hopen + val2 + val3 ) / 4 retvalendTEMA(input, periods = 10) = 3 * eavg($1, periods) - 3 * eavg(eavg($1, periods), periods) + eavg(eavg(eavg($1, periods), periods), periods)HAZLTema(input, periods = 55) = begin retval = 0 TMA1 = TEMA(haClose(input), periods) TMA2 = TEMA(TEMA(haClose(input), periods), periods) difference = TMA1 - TMA2 retval = TMA1 + difference retvalendZeroLagTEMA(input, periods = 55) = begin retval = nonum avg1 = TEMA($1.avg, periods) avg2 = TEMA(TEMA($1.avg, periods), periods) difference = avg1 - avg2 retval = avg1 + difference retvalendcrossTest(series, periods=55) = begin retval = 0 ZLTema1 = ZeroLagTema($1, periods) ZLTema2 = ZeroLagTema($1, periods)[-1] HAZLTema1 = HAZLTema($1, periods) HAZLTema2 = HAZLTema($1, periods)[-1] if( (ZLTema1 > HAZLTema1) and (ZLTema2 < HAZLTema2) ) then retval = -1 if( (HAZLTema1 > ZLTema1) and (HAZLTema2 < ZLTema2) ) then retval = 1 retvalendcrossover(input, periods = 55) = begin retval = nonum if( crossTest($1, periods) == 1 ) then begin retval = 'buy'|clr_white|below|ftiny|arrow|vertical end if( crossTest($1, periods) == -1 ) then begin retval = 'sell'|clr_yellow|above|ftiny|arrow|vertical end retvalend --Jeremiah Adams, Aspen Research Group
Sales: 1-800-359-1121, Support: (970) 945-2921
sales@aspenres.com, support@aspenres.com
Aspenres.com
GO BACK
STRATASEARCH: THE QUEST FOR RELIABLE CROSSOVERS
Once in a while, we come across a new indicator that works perfectly right out of the box. The zero-lag crossover presented by Sylvain Vervoort in his article in this issue, "The Quest For Reliable Crossovers," seems to be one of those indicators. During initial testing on five years of NASDAQ 100 stocks, the zero-lag crossover seemed to perform best at about a 58-day period, which is close to the 55-day period suggested by the author. Holding periods of winning trades was four times longer than those of losing trades, and the average gain was twice the percentage of the average loss. The percentage of profitable trades, however, was only about 35% (Figure 9).  FIGURE 9: STRATASEARCH, CROSSOVERS. While there will always be some lag in a crossover, Vervoort's crossover technique can decrease the lag considerably. In a second test, we ran this indicator in an automated search to test its benefit alongside other indicators. In a few hours, we ran the zero-lag crossover more than 50,000 times, each time testing it with supporting indicators such as price rate-of-change, stochastics, and forecast oscillator. Interestingly, the greatest benefits came when the supporting indicators focused on the sector as a whole, rather than the individual stock. But these supporting indicators greatly increased the annual return in addition to improving the percentage profitability. As with all other Traders' Tips, additional information, including plug-ins, can be found in the Shared Area of the StrataSearch user forum. This month's plug-in contains a number of prebuilt trading rules that will allow you to include this indicator in your automated searches. Simply install the plug-in and let StrataSearch identify which supporting indicators might be the most helpful.
//***************************************// Zero Lag Buy Signal//***************************************avg = parameter("Period");TMA1 = tema(haClose(), avg);TMA2 = tema(TMA1, avg);Diff = TMA1 - TMA2;ZlHa = TMA1 + Diff;TMA1 = tema(tp(), avg);TMA2 = tema(TMA1, avg);Diff = TMA1 - TMA2;ZlCl = TMA1 + Diff;ZeroLagBuy = CrossAbove(ZlCl, ZlHa);//****************************************// Zero Lag Sell Signal//****************************************avg = parameter("Period");TMA1 = tema(haClose(), avg);TMA2 = tema(TMA1, avg);Diff = TMA1 - TMA2;ZlHa = TMA1 + Diff;TMA1 = tema(tp(), avg);TMA2 = tema(TMA1, avg);Diff = TMA1 - TMA2;ZlCl = TMA1 + Diff;ZeroLagSell = CrossBelow(ZlCl, ZlHa); --Pete Rast
Avarin Systems Inc
www.StrataSearch.com
NINJATRADER: THE QUEST FOR RELIABLE CROSSOVERS
The various indicators and strategy discussed in this issue by Sylvain Vervoort in "The Quest For Reliable Crossovers" is available for download at www.ninjatrader.com/SC/May2008SC.zip. Once downloaded, from within the NinjaTrader Control Center window, select the menu File > Utilities > Import NinjaScript and select the downloaded file. This indicator is for NinjaTrader Version 6.5 or greater. You can review the indicator's source code by selecting the menu Tools > Edit NinjaScript > Indicator from within the NinjaTrader Control Center window and selecting either ZeroLagEMA, ZeroLagHATEM, ZeroLoagTEMA. You can review the strategy source code by selecting the menu Tools > Edit NinjaScript > Strategy from within the NinjaTrader Control Center window and selecting VervoortMACrossOver. See Figure 10.
 FIGURE 10: NINJATRADER, CROSSOVERS. The screenshot shows the VervoortMACrossOver strategy backtested on a five-minute chart of the March 2008 S&P emini contract.
NinjaScript indicators are compiled DLLs that run native, not interpreted, which provides you with the highest performance possible. -- Raymond Deux and Josh Peng
NinjaTrader, Llc
www.ninjatrader.com
GO BACK
STRATEGYDESK: THE QUEST FOR RELIABLE CROSSOVERS
In his article in this issue, "The Quest For Reliable Crossovers," Sylvain Vervoort discusses the use of moving average crossovers for entry and exit points. Here, we'll present one interpretation using TD Ameritrade's StrategyDesk. In the article, Vervoort shows the benefits of using a zero-lag moving average. Here is the StrategyDesk formula for a five-day zero-lag exponential moving average (Figure 11):  FIGURE 11: TD AMERITRADE, CROSSOVERS. Buy signals are produced when the five-day zero-lag exponential moving average (red line) crosses above the five-day exponential moving average (blue line); sell signals are shown when the zero-lag average crosses below the normal average. 2 * ExpMovingAverage[EMA,Close,5,0,D] - (.3333*ExpMovingAverage[EMA,Close,5,0,D] + .2222*ExpMovingAverage[EMA,Close,5,0,D,1] + .1481*ExpMovingAverage[EMA,Close,5,0,D,2] + .0988*ExpMovingAverage[EMA,Close,5,0,D,3] + .0659*ExpMovingAverage[EMA,Close,5,0,D,4] + .0439*ExpMovingAverage[EMA,Close,5,0,D,5] + .0293*ExpMovingAverage[EMA,Close,5,0,D,6] + .0195*ExpMovingAverage[EMA,Close,5,0,D,7] + .013*ExpMovingAverage[EMA,Close,5,0,D,8] + .0087*ExpMovingAverage[EMA,Close,5,0,D,9] + .0058*ExpMovingAverage[EMA,Close,5,0,D,10] + .0039*ExpMovingAverage[EMA,Close,5,0,D,11] + .0026*ExpMovingAverage[EMA,Close,5,0,D,12] + .0017*ExpMovingAverage[EMA,Close,5,0,D,13] + .0011*ExpMovingAverage[EMA,Close,5,0,D,14])This formula can be used in comparison with price or other moving averages for the purpose of running a backtest or for program trading. It can also be used to create a custom indicator on a chart.
Here is an example using the formula in comparison with a five-day exponential moving average. This can be used for backtesting or program trading. Entry (Buy):
2 * ExpMovingAverage[EMA,Close,5,0,D] - (.3333*ExpMovingAverage[EMA,Close,5,0,D] + .2222*ExpMovingAverage[EMA,Close,5,0,D,1] + .1481*ExpMovingAverage[EMA,Close,5,0,D,2] + .0988*ExpMovingAverage[EMA,Close,5,0,D,3] + .0659*ExpMovingAverage[EMA,Close,5,0,D,4] + .0439*ExpMovingAverage[EMA,Close,5,0,D,5] + .0293*ExpMovingAverage[EMA,Close,5,0,D,6] + .0195*ExpMovingAverage[EMA,Close,5,0,D,7] + .013*ExpMovingAverage[EMA,Close,5,0,D,8] + .0087*ExpMovingAverage[EMA,Close,5,0,D,9] + .0058*ExpMovingAverage[EMA,Close,5,0,D,10] + .0039*ExpMovingAverage[EMA,Close,5,0,D,11] + .0026*ExpMovingAverage[EMA,Close,5,0,D,12] + .0017*ExpMovingAverage[EMA,Close,5,0,D,13] + .0011*ExpMovingAverage[EMA,Close,5,0,D,14]) > ExpMovingAverage[EMA,Close,5,0,D] AND 2 * ExpMovingAverage[EMA,Close,5,0,D,1] - (.3333*ExpMovingAverage[EMA,Close,5,0,D,1] + .2222*ExpMovingAverage[EMA,Close,5,0,D,2] + .1481*ExpMovingAverage[EMA,Close,5,0,D,3] + .0988*ExpMovingAverage[EMA,Close,5,0,D,4] + .0659*ExpMovingAverage[EMA,Close,5,0,D,5] + .0439*ExpMovingAverage[EMA,Close,5,0,D,6] + .0293*ExpMovingAverage[EMA,Close,5,0,D,7]+ .0195*ExpMovingAverage[EMA,Close,5,0,D,8] + .013*ExpMovingAverage[EMA,Close,5,0,D,9] + .0087*ExpMovingAverage[EMA,Close,5,0,D,10] + .0058*ExpMovingAverage[EMA,Close,5,0,D,11] + .0039*ExpMovingAverage[EMA,Close,5,0,D,12] + .0026*ExpMovingAverage[EMA,Close,5,0,D,13] + .0017*ExpMovingAverage[EMA,Close,5,0,D,14] + .0011*ExpMovingAverage[EMA,Close,5,0,D,15]) <= ExpMovingAverage[EMA,Close,5,0,D,1]Exit (Sell):
2 * ExpMovingAverage[EMA,Close,5,0,D] - (.3333*ExpMovingAverage[EMA,Close,5,0,D] + 0.2222*ExpMovingAverage[EMA,Close,5,0,D,1] + .1481*ExpMovingAverage[EMA,Close,5,0,D,2] + 0.0988*ExpMovingAverage[EMA,Close,5,0,D,3] + .0659*ExpMovingAverage[EMA,Close,5,0,D,4] + .0439*ExpMovingAverage[EMA,Close,5,0,D,5] + .0293*ExpMovingAverage[EMA,Close,5,0,D,6] + .0195*ExpMovingAverage[EMA,Close,5,0,D,7] + .013*ExpMovingAverage[EMA,Close,5,0,D,8] + .0087*ExpMovingAverage[EMA,Close,5,0,D,9] + .0058*ExpMovingAverage[EMA,Close,5,0,D,10] + .0039*ExpMovingAverage[EMA,Close,5,0,D,11] + .0026*ExpMovingAverage[EMA,Close,5,0,D,12] + .0017*ExpMovingAverage[EMA,Close,5,0,D,13] + .0011*ExpMovingAverage[EMA,Close,5,0,D,14]) < ExpMovingAverage[EMA,Close,5,0,D] AND 2 * ExpMovingAverage[EMA,Close,5,0,D,1] - (.3333*ExpMovingAverage[EMA,Close,5,0,D,1] + 0.2222*ExpMovingAverage[EMA,Close,5,0,D,2] + .1481*ExpMovingAverage[EMA,Close,5,0,D,3] + 0.0988*ExpMovingAverage[EMA,Close,5,0,D,4] + .0659*ExpMovingAverage[EMA,Close,5,0,D,5] + .0439*ExpMovingAverage[EMA,Close,5,0,D,6] + .0293*ExpMovingAverage[EMA,Close,5,0,D,7]+ .0195*ExpMovingAverage[EMA,Close,5,0,D,8] + .013*ExpMovingAverage[EMA,Close,5,0,D,9] + .0087 * ExpMovingAverage[EMA,Close,5,0,D,10] + .0058*ExpMovingAverage[EMA,Close,5,0,D,11] + .0039*ExpMovingAverage[EMA,Close,5,0,D,12] + .0026*ExpMovingAverage[EMA,Close,5,0,D,13] + .0017*ExpMovingAverage[EMA,Close,5,0,D,14] + .0011*ExpMovingAverage[EMA,Close,5,0,D,15]) >= ExpMovingAverage[EMA,Close,5,0,D,1]If you have questions about this formula or functionality, please call TD Ameritrade's StrategyDesk help line at 800 228-8056, free of charge, or access the Help Center via the StrategyDesk application. StrategyDesk is a downloadable application free for all TD Ameritrade clients. Regular commission rates apply.
TD Ameritrade and StrategyDesk do not endorse or recommend any particular trading strategy. --Jeff Anderson
TD AMERITRADE Holding Corp.
www.tdameritrade.com
GO BACK
NEOTICKER: THE QUEST FOR RELIABLE CROSSOVERS
We can use the NeoTicker formula language to implement moving average calculations along with a simple trading system as presented in "The Quest For Reliable Crossovers" by Sylvain Vervoort in this issue.
The indicator (Listing 1) has two parameters. The first is an integer parameter for the period of the moving average calculation, with the default set to 55. The second parameter is a string that can turn on the short side of the system, since in the article, the author mentions this system should trade the long side only. The following system code includes the short side and uses the switch parameter to enable or disable the short side. The default short side is disabled. The stop loss is set to 10% of the entry bar range. The system uses trial stops to take profit, and is set at 10% of the current bar range. The indicator has three plot values. The first is current equity of trading system, while the other two are the two moving averages (Figure 12).  FIGURE 12: NEOTICKER, TEMA CROSSOVER. The indicator has three plot values. The first is current equity of trading system, while the other two are the two moving averages. This system code will be available at the NeoTicker blog site (blog.neoticker.com).
LISTING 1$avg := param1; 'moving average period'optional parameter to switch short signals for this system$NoShortSide := paramis(2, "Yes");'Moving average generation codehaOpen := ((O(1)+h(1)+l(1)+c(1))/4 + haOpen(1))/2;haC := ((o(1)+h(1)+l(1)+c(1))/4 + haOpen + maxlist(h, haOpen) + minlist(l, haOpen))/4;TMA1 := tema(haC, $avg);TMA2 := tema(TMA1, $avg);ZlHa := TMA1+(TMA1-TMA2);tyTMA1 := tema(typicalprice(data1), $avg);tyTMA2 := tema(tyTMA1, $avg);ZlCl := tyTMA1+(tyTMA1-tyTMA2);'Corss over signals$tradesignal := xcross(ZlCl, ZlHa);'Rest of these code are NeoTicker trading system codelongatmarket ((openpositionflat > 0) and ($tradesignal > 0), DefaultOrderSize, "Entry long at long signal");'stop lostlongexitstop (openpositionpl <= 0, '10% bar range at entry bar is used as stop openpositionentryprice - (0.1*range((barsnum(0)-openpositionentrybar), data1)), openpositionabssize, "long stop lost");'trial stoplongexitstop (openpositionpl > 0, c-(0.1*range(data1)), openpositionabssize, "long trial stop");'Check to see if short side has been disable before entering a shortshortatmarket ((openpositionflat > 0) and ($tradesignal < 0) and ($DisableShort = 1), DefaultOrderSize, "Entry short at short sgianl");shortexitstop (openpositionpl <= 0, openpositionentryprice + (0.1*range((barsnum(0)-openpositionentrybar), data1)), openpositionabssize, "short stop lost");shortexitstop (openpositionpl > 0, c+(0.1*range(data1)), openpositionabssize, "short trial stop");plot1 := currentequity;plot2 := ZlHa;plot3 := ZlCl; --Kenneth Yuen
TickQuest Inc.
www.TickQuest.com
GO BACK
TRADE NAVIGATOR: THE QUEST FOR RELIABLE CROSSOVERS
Many of the functions given in Sylvain Vervoort's article in this issue, "The Quest For Reliable Crossovers," already exist in Trade Navigator. We will point these out and also indicate the code used for the new indicators. As per usual, you can download special file "SC0508.gzp" to get access to all these functions. All the functions are set up by going to the Edit menu and clicking Functions. From the function list, click "New" to create a new one. After the code has been pasted into the new function window, click "Save" and then give the same name listed here. The components are:
- 10-day exponential moving average (Ema)
- Triple exponential moving average (Tema)
- Tema based on heikin-ashi closing prices
- Highlight bars representing buy and sell signals based on the crossing.
The exponential moving average is already built into Trade Navigator software and is represented as MovingAvgX. The triple exponential moving average is represented as TEMA. Heikin-ashi bars can be applied to your chart as a study. To reference the values in functions, use:
- HeikinAshi Open
- HeikinAshi High
- HeikinAshi Low
- HeikinAshi Close
Use the TradeSense syntax listed below for the remaining functions:
ZeroLagEMA:
MovingAvgX (expression , bars) + (MovingAvgX (expression , bars)
- MovingAvgX (MovingAvgX (expression , bars) , bars , False)) On the input tab, set the following as the default values:
Expression: CloseBars: 7ZeroLagTMA:TEMA (expression , bars , False) + (TEMA (expression , bars , False) - TEMA (TEMA (expression , bars , False) , bars , False))On the input tab, set the following as the default values:Expression: CloseBars: 7ZLCL:TEMA (MovingAvg (Close , bars) , bars , False) + (TEMA (MovingAvg (Close , bars) , bars , False) - TEMA (TEMA (MovingAvg (Close , bars) , bars , False) , bars , False))On the input tab, set the following as the default values:Bars: 7ZLHA:TEMA (HeikinAshi Close , bars , False) + (TEMA (HeikinAshi Close , bars , False) - TEMA (TEMA (HeikinAshi Close , bars , False) , bars , False))On the input tab, set the following as the default values:Bars: 7We'll then use all the functions above to produce our buy and sell signals, represented as ZeroLagBuy and ZeroLagSell.ZeroLagBuy:Crosses Above (ZLCL (bars) , ZLHa (bars))On the input tab, set the following as the default values:Bars: 55ZeroLagSell:Crosses Above (ZLHa (bars) , ZLCL (bars))On the input tab, set the following as the default values:Bars: 55
Figure 13 shows the indicators on the ES-067 continuous contract. The same template can be applied by clicking on the templates menu and clicking "SC0508" after downloading the library.  FIGURE 13: TRADE NAVIGATOR. This chart demonstrates the zero-lag buy and sell.
To download the special file, click on File and then Update Data. Click Download Special File and type "SC0508." Click Start and then follow through the upgrade prompts. --Dave Kilman
Genesis Financial Technologies
http://www.GenesisFT.com
GO BACK
TRADINGSOLUTIOSN: THE QUEST FOR RELIABLE CROSSOVERS
In "The Quest For Reliable Crossovers" in this issue, Sylvain Vervoort discusses trading crossovers between the zero-lag TEMA of the typical price and the zero-lag TEMA of his version of the heikin-ashi close. These functions and the system are described below. They are also available as a function file that can be downloaded from the TradingSolutions website (www.tradingsolutions.com) in the Free Systems section. As with many indicators, these functions could make good inputs to neural network predictions.
Function Name: Triple Exponential Moving AverageShort Name: TEMAInputs: Data, PeriodSub (Mult (EMA (Data, Period), 3), Add (Mult (EMA (EMA (Data, Period), Period), 3), EMA (EMA (EMA (Data, Period), Period), Period)))Function Name: Heikin-Ashi Open (Vervoort)Short Name: haOpenVInputs: Open, High, Low, Close, PeriodDiv (Add (Lag (Div (Add (Add (Open, High), Add (Low, Close)), 4), 1), Prev (1)),2)Function Name: Heikin-Ashi Close (Vervoort)Short Name: haCloseVInputs: Open, High, Low, Close, PeriodDiv (Add (Add (Div (Add (Add (Open, High), Add (Low, Close)), 4), haOpenV (Open, High, Low, Close)), Add (Max (High, haOpenV (Open, High, Low, Close)), Min (Low, haOpenV (Open, High, Low, Close)))), 4)Function Name: Zero-Lag EMAShort Name: ZeroLagEMAInputs: Data, PeriodAdd (EMA (Data, Period), Sub (EMA (Data, Period), EMA (EMA (Data, Period), Period))Function Name: Zero-Lag TEMAShort Name: ZeroLagTEMAInputs: Data, PeriodAdd (TEMA (Data, Period), Sub (TEMA (Data, Period), TEMA (TEMA (Data, Period), Period))Function Name: Zero-Lag Typical Price TEMAShort Name: ZeroLagTPTEMAInputs: Close, High, Low, PeriodAdd (TEMA (Typical (Close, High, Low), Period), Sub (TEMA (Typical (Close, High, Low), Period), TEMA (TEMA (Typical (Close, High, Low), Period), Period)))Function Name: Zero-Lag Heikin-Ashi TEMAShort Name: ZeroLagHATEMAInputs: Open, High, Low, Close, PeriodAdd (TEMA (haCloseV (Open, High, Low, Close), Period), Sub (TEMA (haCloseV (Open, High, Low, Close), Period), TEMA (TEMA (haCloseV (Open, High, Low, Close), Period), Period)))System Name: Zero-Lag TEMA CrossoversInputs: Open, High, Low, Close, PeriodEnter Long: CrossAbove (ZeroLagTPTEMA(Close, High, Low, Period), ZeroLagHATEMA(Open, High, Low, Close, Period))Enter Short: CrossAbove (ZeroLagHATEMA(Open, High, Low, Close, Period), ZeroLagTPTEMA(Close, High, Low, Period)) --Gary Geniesse
NeuroDimension, Inc.
800 634-3327, 352 377-5144
http://www.tradingsolutions.com
GO BACK
SWINGTRACKER: TEMA OVERLAY
The zero-lagging TEMA overlay has been introduced in SwingTracker 5.13.088 based on Sylvain Vervoort's article in this issue, "The Quest For Reliable Crossovers." The indicator can be calculated on either the closing price, typical price, or heikin-ashi price. Several instances of the overlay can be added to the chart with different parameters in order to see the buy/sell signals generated by the crossovers. A sample chart is shown in Figure 14. A sample chart parameters window is shown in Figure 15.  FIGURE 14: SWINGTRACKER, TRIPLE EXPONENTIAL MOVING AVERAGE. Here is a sample chart of the zero-lagging TEMA overlay. 
FIGURE 15: SWINGTRACKER, CHART PARAMETERS
To discuss these tools, please visit our user forum at forum.mrswing.com. If you need assistance, our development staff can help at support.mrswing.com. For more information on our free trial, visit www.swingtracker.com. --Larry Swing
+1 (281) 968-2718
theboss@mrswing.com
www.mrswing.com |
|
|
 [复制链接]


 Frequently, the volume of trading activity at this level will increase dramatically. The inability of the market to sustain the uptrend attracts further profit-taking; at that point, the market undergoes a corrective phase (B). However, the fundamentals underlying the bull market may not have reversed course as yet, and so, the news begins to turn positive and the bullish trend reasserts itself. But sitting on the sidelines are traders and investors recalling the recent highs. They are quietly contemplating that if the opportunity to sell at the highs that they saw before presents itself again, they will take it. As the market rallies back to major resistance, the sellers take this opportunity to offer their shares to the last buyers of the bull market (C). Once the latecomers have bought their shares, the market begins to decline; the sellers have taken control after unloading their holdings. Usually, this second test of major resistance will have noticeably less volume than the first, as the buyers are few and the sellers are relieved that they have made use of the second selling opportunity. Then, the market declines and breaks below the lows established between the two peaks. This signals to the technicians that the double top is complete (D).
  When the market pauses, volume recedes, indicating a dearth of supply and therefore warranting a positive reaction from the traders. The uptrend then continues, reacting to timely positive news, and advances to a new high with expanding volume and forming the head (B). But often, volume levels do not surpass the level observed during the formation of the left shoulder. Soon thereafter, the uptrend stalls as traders opt to move to the sidelines. The price activity levels off, again with the volume receding. For the time being, the trend appears to be intact and simply undergoing a normal correction in an upward trend. The correction may retrace to the level of support established during the formation of the left shoulder. At this point, buyers should reemerge and reestablish the uptrend. During this phase, the uptrend may make it back to the highs seen during the formation of the right shoulder (C). An absence of volume will be noticeable here, indicating that demand is not of high quality. As the right shoulder is being traced on the charts, the technician can draw a trendline, referred to in this situation as the neckline, identifying crucial support along the support levels of the left and right shoulders. This trendline will often be parallel to a line drawn along the peaks of the left and right shoulders. However, the key negative indication is the low volume during the development of the right shoulder. This lack of volume indicates that the smart money was selling into the exuberant rallies, giving up their positions to the latecomers. The sell signal and confirmation of the trend reversal is a penetration of the neckline, accompanied with expanding volume. The price break is the beginning of a bear market. Many times, the market will retrace, retesting the break of the neckline. The inability of the market to return above the neckline of the head and shoulders top brings about another wave of selling.
 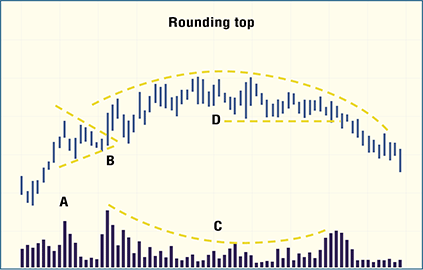 It is at this point that the market will begin to advance, but the high volume seen in the recent rallies is absent. There is a continued trend of increased volume during the advances and lighter volume during the sideways price action, but with each advance, there will be less and less volume. The volume chart (C) will often be a mirror image of the price action. New price peaks are accompanied with lower peaks in volume. At some point, the market peaks and begins to falter. As the market begins to roll over, there should be a support line established under the last consolidation (D). The break of this trendline, with heavy volume, is the signal that the rounding top is complete.
 Return to


 On the other hand, if the volume does not increase, then this lack of volume points to a situation in which sellers are unable to attract a following due to a change in the fundamentals. In this instance, the price action is indicating that there is an upcoming turn in the trend. The smart money was more than likely buying as the head was developing. As the right shoulder is forming, the well-informed money is buying in anticipation of the news turning bullish. At this point, the market begins to advance, rallying to the neckline. A short-term consolidation often ccurs just under the neckline. Next, the market breaks out to the upside with heavy volume (E) and usually with very bullish news. After a few days of consolidation and often a retest of the neckline, the uptrend is under way. It is important that the breakout of the trendline is accompanied with an increase in volume, indicating that large players are confident about the upward trend.
 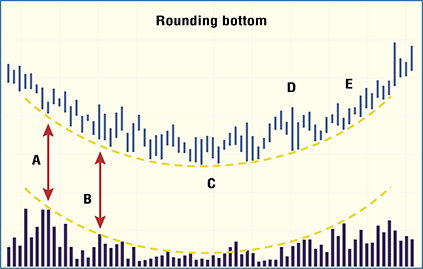 At some point, the sellers and buyers enter into a standoff (C) as shown by the price action; then slowly, the buyers gain the upper hand. It may even occur as a strong sign of demand without a quick followthrough (D), as the base is still building. Throughout this process, the volume pattern follows the price pattern. As prices begin to enter into an uptrend as a series of higher highs and higher lows (E) and the news turns decidedly positive, the rounding bottom pattern is finished.
 Return to


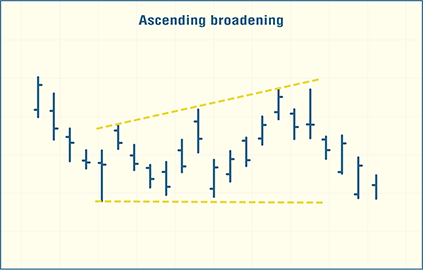 Ascending broadening
 Wedges are similar to triangles, but differ in that with triangles, there is always one boundary line that remains flat; wedges are characterized by both boundary lines being at a slant. Wedges should not be mistaken for pennants, which are much shorter in duration. Rising wedges Rising wedges can be identified by both boundary lines heading up, with the lower line ascending at a sharper pitch than the upper one, indicating fluctuating and strengthening price activity, with the lines eventually meeting. A rising wedge is usually at least three weeks in forming and lasts approximately three months, perhaps four months in all. Falling wedges Falling wedges can be identified by both boundary lines heading down, with the lower line descending at a sharper angle than the upper one, with the lines eventually meeting. This wedge is part of a consolidation pattern. --EMS Flynn REFERENCES Bowman, Melanie, and Thom Hartle [1990]. "Reversal Patterns," Technical Analysis of STOCKS & COMMODITIES, Volume 8: October.
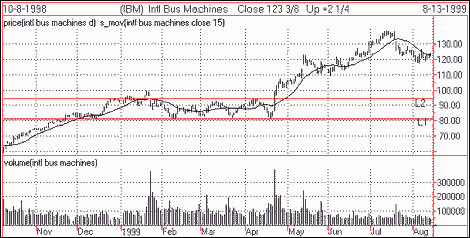 Price movement can be determined by analyzing the moving average, which reveals major and minor trends by smoothing out fluctuations. From October 1998 to early January 1999, the moving average (based on a 15-day value) exhibits an upward slope. It then starts to flatten out, indicating the upward trend has diminished. The flattening of the moving average means the stock is going through a trading range, which may continue for extended periods. During this time, the price of the stock will fluctuate between the support and resistance lines, marked L1 and L2, respectively. The stock has been in a trading range between January and April 1999. The end of the range is signaled by a breakout in price, which goes through the support or resistance levels and moving average line. In this particular case, in late April 1999, the price breaks out above the resistance level and moving average. This move is accompanied by an upsurge in volume. Generally, such a condition shows the beginning of a powerful rally. As you can see, moving averages, support and resistance levels and volume can provide clues to many factors that help the trader in making buy/sell decisions. Understanding the relationship between these three indicators and price movement will provide a good starting point for conducting further analysis.
 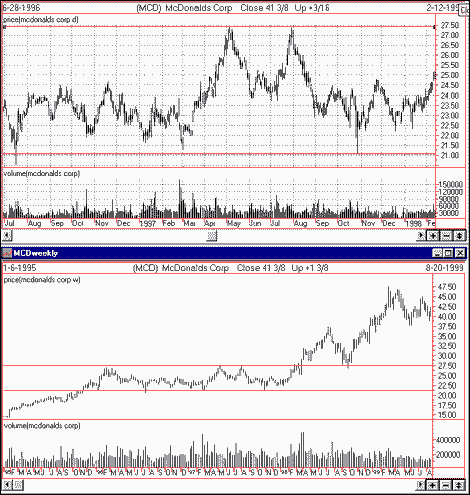 However, it is always best to use more than one time frame for analyzing charts. If you use daily charts for trading it would be helpful to also look at weekly charts, which help identify support and resistance levels and the direction of the major trend. Judging from the weekly chart of McDonalds, between 1996 and 1997 the stock was in a trading range. Notice the support and resistance lines at 21-1/16 and 27-7/16, respectively. From the daily chart you can see that during 1997 you could have taken advantage of these support and resistance levels in your short-term trading. The daily chart is a magnification of the weekly chart. The same concept can be applied to any time frame. For example, if you are a daytrader who studies intraday charts, look at daily charts to identify the major direction of the trend and support and resistance levels.
  RELATED READING Nison, Steve [1991]. Japanese Candlestick Charting Techniques, New York Institute of Finance/Simon & Schuster.
  Figure 1: Coca-Cola
 Figure 1: Amazon.com
 FIGURE 1: SAMPLE CHART WITH BOLLINGER BANDS
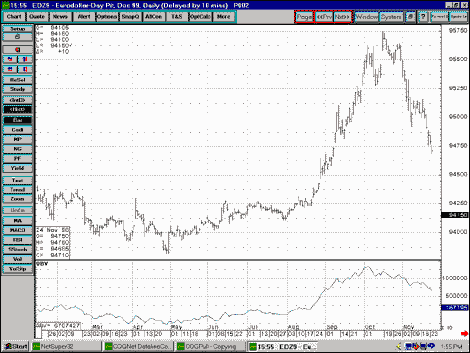 The indicator is best used to define breakouts from price patterns. For example in the figure shows Eurodollars basing in the 9400 - 9425 range during early 1998. OBV declined into its own base during that period but broke above that level in mid-June. Then it continued to gain ground through July. Indeed it wasn't until mid-August that Euros decisively broke the 9425 level. On the same chart, OBV peaked in early October while prices peaked in mid-October, indicating that volume was not supporting further upside moves. Subsequently, OBV broke its neckline of support while prices were still at 9512, about two weeks before prices broke 9500 in the third week of November. As a running sum, OBV isn't a precision indicator but it is a valuable guide to the general trend of price movement.
 According to Steve Achelis, the MACD is most often calculated by subtracting a 26-day moving average of a tradableÕs price from a 12-day moving average of its price, resulting in an indicator that oscillates above and below zero. Then the nine-day exponential moving average of the MACD line is plotted. According to John J. Murphy, the MACD histogram is a variation, plotting the difference between the signal and MACD lines. The changes in the spread between the two lines can be spotted quicker, leading to earlier trading signals. --EMS Flynn SUGGESTED READING Achelis, Steven B. [2000]. Technical Analysis From A To Z, McGraw-Hill.


